template

Wednesday, December 18, 2013

Gluten Free Almond Lace Cookies


For all my gluten free friends, or not gluten free friends, these are cookies you will love. Delicious caramel-y almond crunch cookies that are delicate and very easy to make. No fancy replacement flour or gums in this recipe. Chances are you already have everything in your pantry!

Gluten Free Almond Lace Cookies
Ingredients:
  • 1/2 cup whole natural unsalted sliced almonds with skins
  • 2 tablespoons old-fashioned oats
  • 6 tablespoons (3/4 stick) unsalted butter
  • 6 tablespoons sugar
  • 2 tablespoons (packed) light brown sugar
  • 1 1/2 teaspoons honey or maple syrup
  • 1/2 teaspoon cinnamon
  • 1 tablespoon almond flour (or pulverized almonds)
  • 1/4 teaspoon kosher salt

  • Instructions:
  • Preheat oven to 350 degrees. 
  • Put almonds and oats in food processor until crumbly. Melt butter in a saucepan with sugars and honey. Melt until the sugars are melted and incorporated into the butter. Pour the butter into a bowl with almond mixture, cinnamon, salt and almond flour. 
  • Spoon into small mounds on a NON-STICK cookie sheet. It must be non stick. Bake for 6-8 minutes or until sugar has caramelized, serve with milk or coffee. 


  • Monday, December 16, 2013

    Brown Butter Chocolate-Stuffed Pretzel Cookies

    Is there any cookie better than a true chocolate chip cookie? I don't mean some grocery store kind from a box, I mean a fresh, bakery style, chewy chocolate chunk cookie. My preference would be a cookie with tons or brown sugar, a mixture of chocolate chunks (milk, semisweet, dark) and preferably made with brown butter. That is pure cookie bliss.

    This cookie recipe I have here is pretty much in that same "cookie bliss" category. Except we added pretzel sticks to the dough. So now you've also got that salty/sweet thing going on. I'm just going to let you sit there, think about that, and drool over how good these cookies look. If you're lucky, I'll share.

    Brown Butter Chocolate-Stuffed Pretzel Cookies

    Ingredients:
    1 1/2 sticks (12 tablespoons) of unsalted butter
    1 cup brown sugar
    1/2 cup sugar
    1 egg + 1 egg yolk, at room temperature
    2 teaspoons vanilla extract
    2 cups + 2 tablespoons all-purpose flour
    1/2 teaspoons baking soda
    1/4 teaspoon salt
    1 cup pretzels
    chocolate chunks as desired
    Instructions:
    Preheat oven to 325 degrees F.
    Heat a small saucepan over medium-low heat and add butter. Cook the butter over low heat until brown bits begin to appear. Remove from heat immediately as the butter can burn very quickly. Set aside and let cool for about 10-15 minutes, you can put this in the fridge shortly, until the butter comes to room temperature.
    In a small food processor, chop the pretzels. You can then pour the pretzels into a mesh strainer to sift out any dust/powder. You only want pretzel pieces, not powder. 
    Once butter has cooled, add to the bowl of your stand mixer. Whisk in sugars until smooth and caramely in color, then add in the egg and egg yolk. Mix again until combined, then add in vanilla extract and mix. Add in flour, baking and soda and salt, and mix until a dough forms. Add the pretzels. 
    Roll about 1 1/2 tablespoons of dough into a ball, then press some chocolate chunks into the middle. Top with an additional 1 1/2 tablespoons of dough, and seal the sides, rolling the dough into a golfball-sized ball. Place on a baking sheet about 3 inches apart, they will spread slightly. Bake for 12-14 minutes, or until edges are slightly golden. Enjoy them warm with milk. 
    Recipe adapted from How Sweet It Is


    Sunday, December 15, 2013

    A Family Recipe for a Delicious Oatmeal Cookie

    Finally, I got it right! This cookie recipe comes from my sweetheart's family, from his grandmother on his mother's side. He and his momma sure talked up this delicious oatmeal cookie, no raisins (thank God), I just couldn't wait to try it!

    So try it I did, and the recipe didn't work out! How terrible! The one time I tried a recipe from his family and I screwed it up. Seth had told me he thought they should be more buttery, so I cut half of the crisco and used butter instead. I'm not sure it that is what caused the problem, but they were melted and stuck to the pan. I tried to remedy the situation but there was no solution. The batch was just not right. 

    But tonight, I tried again. I fixed the recipe a little bit and it definitely worked better! I feel bad changing a recipe that is so important to my sweetie, but a girl's gotta do what a girl's gotta do, especially when it comes to cookies! 

    They say that Grandma was one heck of a cook, and that she never had an empty cookie jar. Seth always tells me about the big Sunday dinners she used to cook. I wish I could have met her, but she and I didn't get our timing quite right :) I'm glad to be able to make her yummy cookie recipe, which in truth is VERY yummy. They are chewy yet crunchy, and taste the best right out of the oven. Once they cool, they get nice and crisp and 

    Here is the recipe as it was given to me, my changes are written in red

    Grandma's Oatmeal Cookies

    For square cookies, pack dough into any empty foil, waxed paper, or plastic wrap box lined with foil -
    ^How smart is this tip?!

    1 cup shortening (You can try butter, but this didn't work for me)
    1 cup granulated sugar
    1 cup packed brown sugar
    2 eggs
    1 teaspoon vanilla
    1 1/2 cups all-purpose flour (I used 2 cups)
    1 teaspoon salt
    1 teaspoon baking soda
    1 teaspoon ground cinnamon
    1 1/2 cups quick-cooking rolled oats
    1/2 cup finely chopped walnuts  - Optional  (She used pecans, if she used nuts at all.  Much more Texany!  They were often not included.)  

    Cream together shortening, granulated sugar, and brown sugar till light and fluffy.  Add eggs, one at a time, beating well after each; add vanilla.  Thoroughly stir together flour, salt, baking soda, and cinnamon; stir into creamed mixture.  Stir in oats and nuts.  Shape dough into two 8-inch rolls.  Wrap in waxed paper or clear plastic wrap.  Chill thoroughly.  Cut into 1/4 inch slices.  Place on greased cookie sheet.  Bake at 350 degrees for 8 to 10 minutes.  Makes about 5 dozen cookies.

    I did not refrigerate my successful batch, nor did I form it into a roll and slice it, though this does work. If you add the extra flour, you can simply roll the dough into balls and place them on the baking sheet. Do not overcook these! They are just too good soft, and it would be a shame. 

    Simple, but delicious, and sweet memories of a cookie-baking Grandma who never had an empty cookie jar.


    Friday, December 13, 2013

    "Coquito" Coconut Cookies

    Two of my very best friends from college were from the lovely island of Puerto Rico. Our first December away from home they made a traditional Puerto Rican drink called Coquito, the Puerto Rican answer to our egg nog. And the Puerto Ricans know their rum, so you know good and well that they know how to drink rum for the holidays. Being that I am a big coconut fan, and not a very big egg nog fan, I absolutely loved this drink. I'll even share the recipe with you very soon.

    But for now, we've got Coquito cookies! I searched everywhere for a recipe for coquito cookies to come up with something great, but I only found one. So my version is inspired solely by my taste buds and a little blog called Mind Over Batter.


    Coquito Coconut Cookies
    Ingredients:
    • 3 1/2 cup flour
    • 1 tsp. baking powder
    • 1 ½ tsp. ground cinnamon
    • 1 tsp. ground ginger
    • ½ tsp. ground cloves
    • ¼ tsp. freshly grated nutmeg
    • 1 cup (2 sticks) of unsalted butter
    • ½ tsp. salt
    • 1 8oz. package of cream cheese
    • 1 1/2 cup light brown sugar, packed
    • 1 ¼ tsp. vanilla extract
    • 1 egg
    • Coquito topping – Recipe follows
    Instructions:
    1. Combine dry ingredients, set aside. Mix wet ingredients on low in a stand mixer, until well combined and fluffy. Add dry ingredients to wet, mix until well combined. Split dough in two, wrap both mounds in plastic wrap and refrigerate until firm, about 3 hours. 
    2. Sprinkle flour onto a hard surface and roll out dough to 1/4 inch thickness. Using a round cutter or the rim of a cup, cut out circles. Using a pastry tip or other small round cutter, cut the interior out of the cookie to resemble a doughnut. Place rounds on a sprayed baking sheet, bake at 350 degrees for 12 minutes. Let cool. 
    3. Spread with coquito topping, and chill until topping is firm. Serve and enjoy!
    Coquito Topping:
    • 1 12 oz. can evaporated milk
    • 1 12 oz. can coconut milk
    • 1 cup sugar
    • 3 TB spiced rum
    • 1 tsp. cinnamon
    • 1 tsp. ground ginger
    • 1/2 tsp. cloves
    • 1/2 tsp. nutmeg
    • 3 cups shredded coconut
    1. Put milks, sugar, rum and spices in a saucepan over low heat. Simmer until the mixture has reduced by half and become thick. 
    2. Remove from heat, let cool 15 minutes. Add shredded coconut. 
    3. Let chill in the refrigerator another 15 minutes, spread onto cooled cookies. 

    Double Chocolate Coconut Mocha Fudge

    Some of us are lucky, and by that I mean that some of us were blessed enough to taste the Coconut Mocha drinks from Starbucks before they were discontinued. They were SO. GOOD. Delicious coconut flavored cocoa drinks, cold or hot, then topped with chocolate sauce and toasted coconut. They were heaven on earth, and no coffee will ever compare. Not even my beloved Peppermint Mocha can beat this one.

    One day two summers ago, I remember ordering a coconut mocha and the barista told me that mochas were buy one get one FREE! I looked to my left, to my right, realized I was going at this one alone. So I double fisted my Starbucks mochas. That was a wonderful and delicious day.

    Now, Starbucks did not bring back the coconut mocha this past summer. They replaced the coconut mocha with those homemade sodas or whatever, don't even get me started. Also, who in the world ever decided that coconut was a flavor specific to summertime? Last I checked, you can get mounds candy ALL YEAR. So why Starbucks, why do you not keep around the delicious magic that is chocolate and coconut?! You should know better.

    I have made this recipe for a few years, inspired by a recipe from a wonderful blog called How Sweet it is, I've been following her recipes for years. I believe she and I have a mutual understanding of the glory that is the coconut mocha.

    Double Chocolate Coconut Mocha Fudge
    Ingredients:
    • 1 bag semisweet chocolate chips, 12 oz.
    • 1 bag white chocolate chips, 12 oz. 
    • 1 can sweetened condensed milk
    • 1 pkg. coffee granules (enough to make 1 cup)
    • 1 tsp. vanilla extract
    • 1 tsp. coconut extract
    • 2 TB coconut oil, separated
    • 1/2 cup toasted coconut 
    Instructions:
    1. Line a square or rectangular baking pan with plastic wrap (an 8x8-10x10 is ideal, the smaller the pan, the picker the fudge). 
    2. In a microwave safe bowl, combine semisweet chocolate, half of the condensed milk, coffee powder, vanilla , and 1 TB coconut oil. Melt 30 seconds at a time, stirring between each interval, until completely melted and combined. 
    3. Spread into your baking pan evenly, then place in fridge/freezer for about 1 hour, or until firm.
    4. Once bottom layer is firm, melt the white chocolate, coconut flavoring, remaining condensed milk and coconut oil. Melt in the microwave in intervals, stirring in between until mixture comes together and is completely melted. 
    5. Spread the white chocolate mixture over the chocolate and sprinkle the top with toasted coconut. Refrigerate until firm. 
    6. Lift the plastic wrap from the pan, moving the entire piece of fudge to a cutting board. Cut into desired size squares and enjoy!
    *Recipe adapted from Howsweeteats.com


    Wednesday, December 11, 2013

    Chocolate Chunk Biscotti

    You guys... I hate to do this to you, but these cookies are just too good. So incredibly delicious, if you don't try them we can no longer be friends. These are those kinds of cookies. These cookies make me so happy, and they make me want to tell you a little story.

    Once upon a time I was a somewhat picky child who didn't know what was good for me. There were certain types of cookies that would appear in our home around the holidays, usually from a neighbor or old friend, and many of those cookies would simply be overlooked by me. Almond spritz cookies? No thanks. Anything with dried fruit? Hell no. Biscotti? That doesn't even look like a cookie, why would I eat that?

    A lot of years went by where I didn't appreciate cookies that were much better than they looked. I still could care less about a cookie with fruit in it, but you would have to pry a biscotti cookie from my cold dead hands before I would give you mine. And if I had a nice latte to go with it? I'm already in heaven.

    This is one of those yummy yummy cookies that makes me happy to be an adult who is smart to know that these cookies are just as good as a decorated cookie with frosting and sprinkles. They are just perfect when dipped in coffee or hot cocoa, just long enough to soften them and warm up the chocolate chunks. If you're lucky, you'll find yummy crumbs at the bottom of your coffee cup. So many good things to be thankful for.

    Chocolate Chunk Biscotti
    Ingredients:
    • 2 TB Softened Butter
    • 3/4 cup Sugar
    • 1 1/2 tsp Vanilla
    • 2 Eggs
    • 2 cups AP Flour
    • 2 tsp Baking Powder
    • 1/2 tsp salt
    • 1/2 cup Chocolate Chunks
    • 1/2 cup White Chocolate Chips
    Instructions:
    1. Mix butter, vanilla, sugar, and eggs until all combined. In a separate bowl, mix salt, flour, and baking powder. Add the dry ingredients to the wet, mix until combined. Add chocolate chips and evenly mix throughout the dough. 
    2. Split the dough in two, and form into log shapes that are about 1.5 inches thick. Place the biscotti dough on a sprayed cookie sheet. Wet your hands lightly and smooth the tops of the dough, this will help create a smooth crust. Bake at 325 degrees for 20-25 minutes, or until the bottoms have browned and the tops of the dough logs are beginning to crack. 
    3. Let cool for 15 minutes, or until the logs have firmed up and aren't too hot to touch. Using a serrated knife, cut slices that are 1/2 inch thick. Place those slices back on the cookie sheet, laying flat, and bake at 300 degrees for another 15 minutes or until the interior is cooked throughout. Serve with coffee or warm cocoa. 
    Before baking. 

    After first baking. 

    After second baking. 

    Delicious and crunchy biscotti!

    Monday, December 9, 2013

    Peppermint Divinity Sugar Cookie Bars

    You guys, these are good. And I mean really good. This is one of those days where I really just have to toot my own horn and give myself a couple pats on the back. You need to make these, and when you do, pat yourself on the back while you eat one, two, a few....

    If you haven't heard of divinity before, it's a traditional southern candy that you find at old bakeries and fudge shops. You usually find divinity filled with chopped pecans and eaten as a candy, but i've changed it up a little bit today. The texture is in between marshmallow and fluffy frosting, which makes it absolutely perfect for topping sugar cookies.

    The cookie dough used for this is buttery and flaky, and very thick. It isn't super sweet, it's like a sweeter/thicker version of a pie crust, and oh so yummy. You bake the cookies while you make the divinity candy, and by the time your candy is done, take the cookies out and top them with their fluffy sugary fate. Sprinkle with peppermint candies and christmas sprinkles, and you've got the perfect treat to eat with coffee.

    Peppermint Divinity Sugar Cookie Bars
    Ingredients:
    • 3 cups flour
    • 1 TB baking powder
    • 1/2 tsp. salt
    • 2 tsp. vanilla, divided
    • 1 cup butter, softened
    • 2 cups sugar, divided
    • 1/4 cup plus 2 TB water, divided
    • 1/4 cup light corn syrup
    • 2 egg whites
    • 1/4 cup chopped candy cane flavored hershey kisses
    • 1/4 cup crushed candy canes
    • red sprinkles
    Instructions:
    1. Preheat oven to 375 degrees. Line a baking pan with foil or parchment paper, leaving about 3 inches excess going up the sides of the pan. You can use a 13x9 pan to make 32 thin bars, or use a 9x9 square like I did to get 20 thicker bars. The thickness is great because the cookie stays soft. That's all up to you and what you've got. 
    2. Cream the butter with 1 cup of the sugar, then add 1 tsp. vanilla, 2 TB water, flour, salt and baking powder. Mix until the mixture hold a ball shape and can be molded. 
    3. Press the sugar cookie dough evenly into the baking pan. You can use a spatula to press into the corners and make sure the dough is pressed very evenly. Put the dough into the oven. 
    4. While the dough is baking, put the 1/4 cup water, remaining 1 cup of sugar, and 1/4 cup corn syrup into a saucepan. Stir only until the sugar is dissolved. Let the mixture boil for about 5 minutes on medium high heat. if you have a candy thermometer, use it now and cook the mixture to 250 degrees. If you do not have a thermometer, you will need a cup of ice water. Test a small spoonful of the syrup by pouring it into the ice water. We want the syrup to form into a ball, but still be malleable. This is called the hard ball stage. If the mixture dissolves or is in a very melty ball, continue to cook the syrup until the hard ball stage. If the sugar instantly hardens in the water, it is past the hard ball stage but can still be used, as long as it has not begun to change color. 
    5. In your stand mixer, beat the egg whites until they reach soft peaks. With the mixer still running, slowly pour the syrup into the egg whites. Pour all of the syrup in, add the remaining teaspoon of vanilla, and beat until the mixture reaches stiff peaks. 
    6. Check the cookie, after about 10-15 minutes of baking they should be turning golden at the edges, this is perfect! You want this to be slightly undercooked. 
    7. Spread your divinity candy evenly over the cookie using a spatula. 
    8. Sprinkle the christmas candies evenly over the divinity, and place the baking pan in the fridge to set. 
    9. After about 30 minutes in the fridge, take the pan out. Pull up on the foil/parchment to loosen, then lift the entire cookie out of the pan. Slice as many servings as you would like. 
      After pulling the foil off the sides. 

      Lovely layered divinity bars!

    Sunday, December 8, 2013

    Two Kid Friendly Christmas Cookies!

    I started working for a new family today, helping to nanny and make meals for the week. I had the pleasure to make Christmas treats with a sweet five year old today, and we are happy to share these easy recipes with you!

    Merry Magic Wands
    Ingredients:
    • 1 bag white chocolate, melted
    • 1 bag pretzel rods
    • various christmas sprinkles
    Instructions:
    1. Spread a piece of parchment paper or foil onto a cookie sheet. 
    2. Dip a pretzel rod into the melted chocolate, spinning until it's completely coated 60% of the way up. Shake the pretzel slightly for all excess chocolate to drip off. 
    3. Place the pretzel onto the parchment, and have the kids put sprinkles all over the chocolate, they will have so much fun with this. 
    4. Place the pretzels in the fridge until chocolate is firm, then place in a tall serving container and enjoy!


    Rudolph Pops
    Ingredients:
    • 1 package peanut shaped cookies
    • 1 bag chocolate, melted
    • 1 bag mini pretzels
    • 1 package lollipop sticks
    • 1 bag M&Ms. (M&M minis work great for eyes, though they are harder to find)
    • You can also use Wilton brand candy eyes. 
    Instructions
    1. Line a cookie sheet with parchment paper or foil for easy cleanup. 
    2. Depending on the thickness of your lollipop sticks, stick them into the cream of the cookie. If the lollipop sticks are too thick, dip them in the melted chocolate and place it between the two cookies, waiting until the chocolate dries before continuing to the next step.
    3. Dip the cookies into the melted chocolate, letting excess chocolate drip off before placing on the cookie sheet. 
    4. Take two pretzels and place them for antlers, and candies for eyes and a red nose. Of course, with kids, they candy will be put everywhere and most of them will not look like rudolph, but that's okay. 
    5. Enjoy spending time with your kids and giving them a little extra sugar!
    What to do if the lollipop sticks are too thick. 

    Ready for dipping

    Ready for a sleigh ride! 

    Saturday, December 7, 2013

    It's Cookie Butter Time!

    Unless you have been living under a rock for the past 3 years, you must know what cookie butter is by now. It's a heavenly spread the thickness of peanut butter, but made from CRUSHED COOKIES! 

    Even after being the world's biggest cookie butter fan, there are days that I still can't believe that such a thing exists. I mean, taking cookies and then turning them into butter....it's the American dream. It's everything every child has ever wanted for Christmas, they just didn't know it yet. 

    If you don't know where to buy cookie butter, my best suggestion is to go to your local Trader Joes. Though, if you live in Austin, Trader Joes probably doesn't have any more since we only have ONE Trader Joes. Don't even get me started on that silly debate. If you don't have a TJs, Wal Mart sells Biscoff brand cookie butter. You may also find this at HEB. 

    Anyway, it seems to be the next natural progression, after turning cookies into butter, is to turn that butter back into cookies. These cookies are like an elevated version of a soft ginger cookie. This world is a magical, magical place. 

    Brown Sugar Cookie Butter Cookies
    Ingredients:
    • 1 large egg
    • 1 cup cookie butter
    • 3/4 cup light brown sugar, packed (Use only LIGHT brown sugar)
    • 1 1/2 tablespoons vanilla extract
    • 3/4 cup flour
    • 2 teaspoons cornstarch
    • 1 1/2 teaspoons cinnamon
    • 1 teaspoon baking soda
    • pinch salt
    Instructions:

    1. Using a paddle attachment in a stand mixer, mix egg, cookie butter, vanilla and brown sugar until fluffy. (This will not react the same as whipping real butter and white sugar, but get it as fluffy as possible.)
    2. Stop, scrape down the sides of the bowl, add flour, cornstarch, cinnamon, baking soda, salt, and mix until combined. Refrigerate until firm, about 2 hours. 
    3. Roll into balls about 1.5 inches in diameter. Space them out 2" apart on a greased cookie sheet. 
    4. Preheat oven to 350 degrees, bake cookies for 8-12 minutes depending on desired texture. 8 minutes for soft cookies, 12 for crisp cookies. 
    5. Wrap them in a pretty Christmas bow and share them with someone who could use something do yummy. 

    You could even spread cookie butter on these as you eat them, which really should be a crime. 

    Friday, December 6, 2013

    The Best Little Cookies From Mexico

    These cookies are a Christmas classic here in Texas, and a wedding classic in Mexico! They're Mexican Wedding Cookies! Small, yummy little shortbread cookies with little bites of pecans perfectly distributed throughout. They're the perfect size, and the recipe couldn't be easier. 

    This is one of those cookies that is just too good to mess with. The traditional recipe is great without anything added to it. That being said, I added cinnamon! I didn't have any Mexican vanilla left, and a touch of cinnamon will give you that richer vanilla flavor you will find in traditional Mexican Wedding Cookies. If anything, the cinnamon only made that traditional flavor even better! As a matter of fact,  these cookies are my Nanny's(Grandma's) favorite, and I'll be bringing them by her house tomorrow, we'll see if she tastes a difference.

    The thing about these cookies that is the most important is that when you coat them with powdered sugar, you don't do it once but TWICE! Let the cookies cool after baking for about 5 minutes, and roll them in the powdered sugar while the cookies are still warm. Then, let them cool completely. By doing this, the powdered sugar will become moistened by the steam that is leaving the cookies, giving you a heavy coating of powdered sugar. Once they cool completely, roll them in the sugar again, and this time you will get that perfectly powdered look that is just perfect for Christmas. 

    Mexican Wedding Cookies
    Ingredients
    • 1 cup butter, softened
    • 1 cup powdered sugar, divided
    • 1 tsp vanilla
    • 1 tsp cinnamon
    • 2 cups flour
    • 1 cup finely chopped pecans
    Instructions
    1. Preheat oven to 350 degrees. Beat butter, 1/2 cup powdered sugar, vanilla, and cinnamon. 
    2. Add in half of flour, mix well. Add in pecans and the rest of the flour until evenly combined. 
    3. Roll into 1 inch balls and place on a greased cookie sheet, about 1 inch apart. Bake for 10-12 minutes or until the bottoms start to brown.
    4. Wait 5 minutes, then gently roll the cookies in powdered sugar. Transfer to another plate to let them cool completely. 
    5. Once cooled, roll them in powdered sugar one final time. Enjoy!
    What your cookies will look like after the first dusting of powdered sugar, slightly pastey....

    After second coating, they look like perfect little snowballs!

    Put them in an adorable Christmas gift box and share them!

    Thursday, December 5, 2013

    What I Should Have Called This Blog...Oh yeah, and a Cookie

    What I should have called this blog: "How to make you and your boyfriend 25 pounds heavier by Christmas".

    This is our 5th cookie this week. Which means as a minimum, we would have each eaten 5 cookies. Though of course we haven't eaten just one of each....

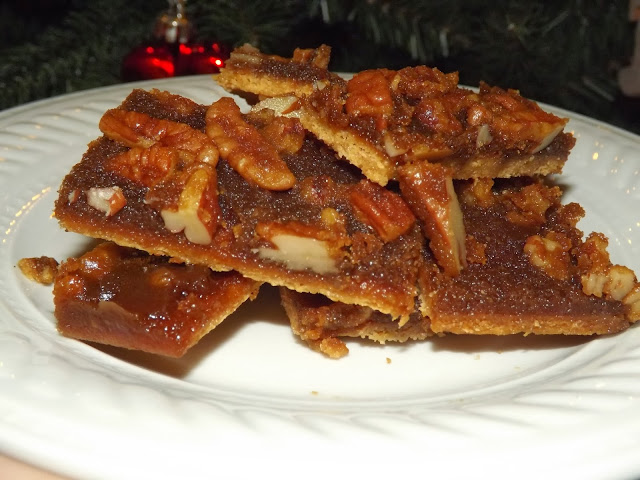
    Either way, they are all delicious. Today's calorie filled holiday treat is just as good, if not better, than all of the others. This recipe comes from my mom, and is one of the few recipes we make every year no matter what. This is one of those fun recipes that pushes the envelope on what classifies as a cookie. It starts with graham crackers and is topped with a yummy toffee like syrup. Basically a hand held pecan pie bite. Worth every calorie.

    Pecan Grahams
    Ingredients
    • 1 cup butter, 2 sticks
    • 1 cup light brown sugar
    • pinch salt
    • 1 cup pecans
    • 12 graham crackers
    Instructions
    1. Preheat oven to 300 degrees. Spread graham crackers on an ungreased cookie sheet. 
    2. Melt butter over medium heat, add brown sugar, salt, stir continuously. Cook about 2 minutes, or until sugar is well disolved and mixture is homogenous and beginning to boil. 
    3. Add in pecans, cook about 1 minute more, stirring continuously. 
    4. Pour the mixture onto the grahams, spread evenly. 
    5. Bake for 15 minutes, let cool for 10 minutes, and cut into rectangles. Enjoy!
    Syrupy mix...

    Pour over grahams

    Yummy pecan grahams!

    Wednesday, December 4, 2013

    Maybe My Favorite Cookie Ever

    When I was 16, my very first job was at a cupcake bakery at the mall. The cupcakes were amazing, and I am not just saying that since I worked there. I still try to find cupcakes that are as good as the cupcakes were at this bakery. But what most people didn't know was that they were wasting time with those delicious cupcakes. For this bakery sold beloved Peanut Butter Blossoms, and they were the best peanut butter cookies I have EVER had. 

    Now, I'll be the first to admit that my recipe for peanut butter blossoms is not as good as those cookies were. But I don't know that I have every baked, or even eaten a better cookie than those peanut butter blossoms. Thinking about those cookies makes me very happy, and making my own gets me as close as I can get to having one again. Maybe one day I'll get that recipe, but for now, these are for sure second best. 

    Peanut Butter Blossoms
    Ingredients:
    • 1/2 cup (1 stick) salted butter, slightly softened
    • 1/2 cup creamy peanut butter
    • 1/2 cup packed brown sugar
    • 1/2 cup granulated sugar 
    • 1 large egg
    • 2 TBS milk
    • 1 1/2 tsp vanilla extract
    • 1-3/4 cups all-purpose flour
    • 1 tsp baking soda
    • 1/4 cup granulated sugar, for rolling
    • 1 bag Hershey's kisses, unwrapped
    Instructions
    1. Preheat oven to 375.
    2. In a medium bowl, stir together flour and baking soda. Set aside.
    3. In the bowl of your mixer, beat butter, brown sugar and 1/2 cup granulated sugar on medium speed until light and fluffy. Beat in egg, vanilla, and milk until blended.
    4. With the mixer on low, slowly add flour mixture. Mix until completely blended.
    5. Cover dough and chill for at least several hours or overnight.
    6. Using a small cookie scoop, scoop chilled dough and roll into a ball with your hands. THIS IS THE MOST IMPORTANT PART! This cookie is all about the ratio of cookie to chocolate, so keep your cookies small. I'm talking a scoop of dough the size of a melon baller.  Roll in granulated sugar and place about 2 inches apart on greased cookie sheets. Bake for about 9 minutes, until edges are just starting to turn golden. Remove from oven and immediately top with a Hershey kiss, pressing into the center of the cookies. 
      Be careful, these are dangerous. 

    Tuesday, December 3, 2013

    A Cookie for Hanukkah


    To all my friends who celebrate Hanukkah, I hop you've had a great first few days of celebration. Hopefully you find this cookie recipe before the end of the holiday this week, though you very well could be full of latkes and babka. 

    To those who don't celebrate with blue and white, these cookies are also perfect for Christmas. All you have to do is change the color of the sprinkles you buy, though the blue and white do make a lovely snow themed gift. What I'm trying to say is...whatever the color, these are some darn good cookies. 

    Glitter Ball Cookies
    Ingredients
    • 1 cup (2 sticks) unsalted butter, softened
    • 1/2 cup confectioners' sugar, sifted
    • 1/4 teaspoon salt
    • 1 teaspoon pure vanilla extract
    • 1 vanilla bean, optional
    • 2 cups plus 2 tablespoons all-purpose flour
    • Sanding sugar, in assorted colors
    • Buttercream filling of your choice
    1. Preheat oven to 350 degrees. Beat butter, confectioners' sugar, and salt with an electric mixer on medium-high speed until pale and fluffy, 3 to 4 minutes, scraping down side of bowl as necessary. 
    2. Slice the vanilla bean lengthwise, and use the back of a knife to scrape out all of the beans. Beat in vanilla extract and vanilla beans
    3. Turn speed to low; add flour, and mix just until combined. 
    4. Shape into 3/4-inch balls, they will bake into half sphere shapes. 
    5. Place various colors of sanding sugar in shallow bowls. (Note: make an even number of each color so you have two matching halves to make one whole glitter ball.) Roll each ball in sanding sugar, and place on parchment-lined baking sheets, spacing 1 inch apart.
    6. Bake until edges begin to golden, about 15 minutes. These cookies are very crumbly, so make sure you let them cool completely before pulling them off of the baking sheet.
    7. Spread the filling of your choice on the bottom of a cookie, and top with a second cookie. Enjoy!
    You can use any filling you would like. I have used honey buttercream for Hanukkah, but I personally love cream cheese icing the best. You can add whatever flavor makes you happiest. Heck, you can even use store bought if that's what you've got on hand. Here is my cream cheese recipe for kicks:

    Cream Cheese Frosting, small batch
    • 4 oz cream cheese, softened
    • 4 TB butter
    • 1 cup powdered sugar
    • pinch salt
    • 1 tsp. vanilla
    Add all ingredients in a bowl and mix on high, until smooth and there are no lumps. Refrigerate after making. 

    Before...
    After! Aren't they just lovely?! Happy Holidays to all!

    Monday, December 2, 2013

    "Catch a Man by Christmas" Cookies


    Have you ever heard of a "boyfriend cookie?" If so, you know what they say about these cookies; so good they may just land you a boyfriend. And if they don't do that, they are certainly a great replacement for a boyfriend. Since I already have a boyfriend, I can't promise you that these cookies will actually catch you a man, but I can tell you that my guy LOVED these cookies. He said "oh, these are good..." while shoving another cookie in his mouth. So I may not have caught a man with a cookie, but I sure have kept one!

    I call my version of boyfriend cookies "Catch a Man by Christmas" cookies because these are perfect man cookies. No frill, no fluff, just darn good cookies. Perfect for kids, too! They're crunchy on the bottom and soft in the middle. You HAVE to eat them while they're still warm, and with milk. Lots of milk. If not, you're doing it wrong. 

    "Catch a Man by Christmas" Cookies
    Ingredients:
    • 1 cup butter, softened
    • 3/4 cup packed brown sugar
    • 1/4 cup white sugar
    • 1 (3.5 ounce) package instant vanilla pudding mix
    • 2 eggs
    • 1 teaspoon vanilla extract
    • 2 1/4 cups all-purpose flour
    • 1 teaspoon baking soda
    • 1 cup chocolate chunks
    • 1/2 cup white chocolate chips
    • 1/2 cup Christmas M&M's
    • 1/2 cup Chopped Walnuts
    Directions

    1.Preheat oven to 375 degrees. 
    2.In a mixing bowl, cream butter and sugars until fluffy. Add pudding mix, eggs and vanilla. Combine flour and baking soda; add to creamed mixture and mix well. Fold in chocolate chips and remaining candy. 
    3. If dough is sticky, refrigerate until it firms up. 
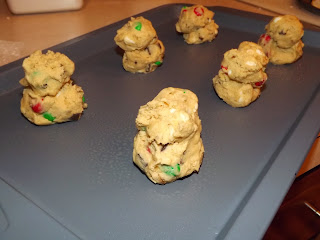
    3. Here is the important part: Roll the cookies into golfball size, and then break them in half. Then stack them in half like a snowman. Crazy, I know, but trust me. This is the key to keeping your cookies soft in the middle and not crisp throughout. Life changing. 
    What your dough should look like before adding the candies...
    After the candies, yum!


    Break them apart...
    Stack them like so....

    And you get these beauties! Now, go catch yourself a Christmas sweetheart, or have another cookie. Whatever works. 

    Sunday, December 1, 2013

    Hey There, Have a Cookie

    Ready for a cookie recipe? How about 25 cookie recipes?! Throughout the month I'll post a holiday themed cookie recipe for you to try, swoon over, or share. I'll do my best to share any other holiday related doings as well, such as DIY projects or other recipes. Also, I'll do my best to deliver each batch of cookies to a different person in my life. If I know who they are ahead of time, I'll write them a little message here about why they got that cookie. So keep watching, you never know if the next cookie will be for you! Now that we've got all that out of the way, lets have a cookie.

    The first recipe I'm going to share is for Peppermint Chocolate Thumbprint Cookies, a perfect crunch without too much sweetness. They are a perfect holiday treat, great for a cookie exchange, and this is a  really easy recipe to follow. Perfect cookie to bake while you're busy putting up your Christmas decorations, just as my family did tonight.

    Also, let me introduce you to my co-star, my beautiful brand new KitchenAid mixer. I won this after attending the Austin Food and Wine festival, and since I already have a mixer, she's been sitting in a box in the garage for months. Of course, since she is the perfect shade of holiday red, I set her free! Now the song "Isn't She Lovely" should be playing in your head.

    As for the cookies:

    Peppermint Chocolate Thumbprint Cookies

    Ingredients:
    • 1 cup Unsalted Butter, softened (2 Sticks)
    • 1/2 cup Confectioner's Sugar
    • 1 tsp. Vanilla extract (I always use Mexican Vanilla)
    • 2 1/4 cup All Purpose Flour
    • 1 box Chocolate Pudding mix (3.9 oz pkg.)
         For filling:
    • 1/2 cup crushed peppermint candy canes
    • 1/2 cup Confectioner's sugar
    • 1 oz Cream Cheese
    • 1 TB milk
    • Extra candy cane pieces for topping
    1. Preheat your oven to 350 degrees. Spray a baking sheet with cooking spray, or line with parchment paper. Parchment is always a great idea for even baking and easy clean up. 
    2. Cream butter with powdered sugar on low mixing speed, until well combined and fluffy. Add vanilla. 
      See, so fluffy!


    3. Add flour and pudding mix, mix on low until combined and crumbly. The batter should be the same texture as play dough. 
    4. Roll the dough into 1" balls, spreading evenly on the cookie sheet. Put your thumb in the center to create a crater, like so...
    If you're busy taking photos, have your boyfriend put his thumb in. 
    5. Make the filling, mixing all the ingredients in a bowl until well combined. This works best when the cream cheese is soft. 
    6.Scoop the peppermint filling into the thumbprints, being careful not to overflow. If you overfill them, they will ooze and turn to caramel on the pan. You can decide if this is a good or bad thing. 
    7. Bake 10-15 minutes or until they are done. I say this because so many people follow instructions too literally. You're oven is different than mine, so just see what the cookies tell you. You want the filling to just begin to bubble and turn a shade darker. That's when they're perfect for a nice glass of milk. 
    Now take a picture of them in front of your pretty Christmas decorations!

    Enjoy!